Managing Your Opportunity Submissions SCREENSHOTS TERESA
Curators face many challenges when it comes to organising open calls. These challenges include the need to organise a potentially large number of submissions, the time-consuming nature of reviewing each submission, making decisions, and then communicating with applicants, as well as the need to export information to create labels or catalogue entries.
We understand these challenges, and have created a comprehensive solution for curators to effectively manage and review open call submissions. Our centralised platform enables curators to easily tag, filter and assess submissions, add personal notes, and communicate directly with applicants. We also provide options to download submissions, allowing curators to review submissions offline.
Our handy tutorial will guide you through the steps of using the system to manage your opportunity submissions efficiently.
Viewing submissions
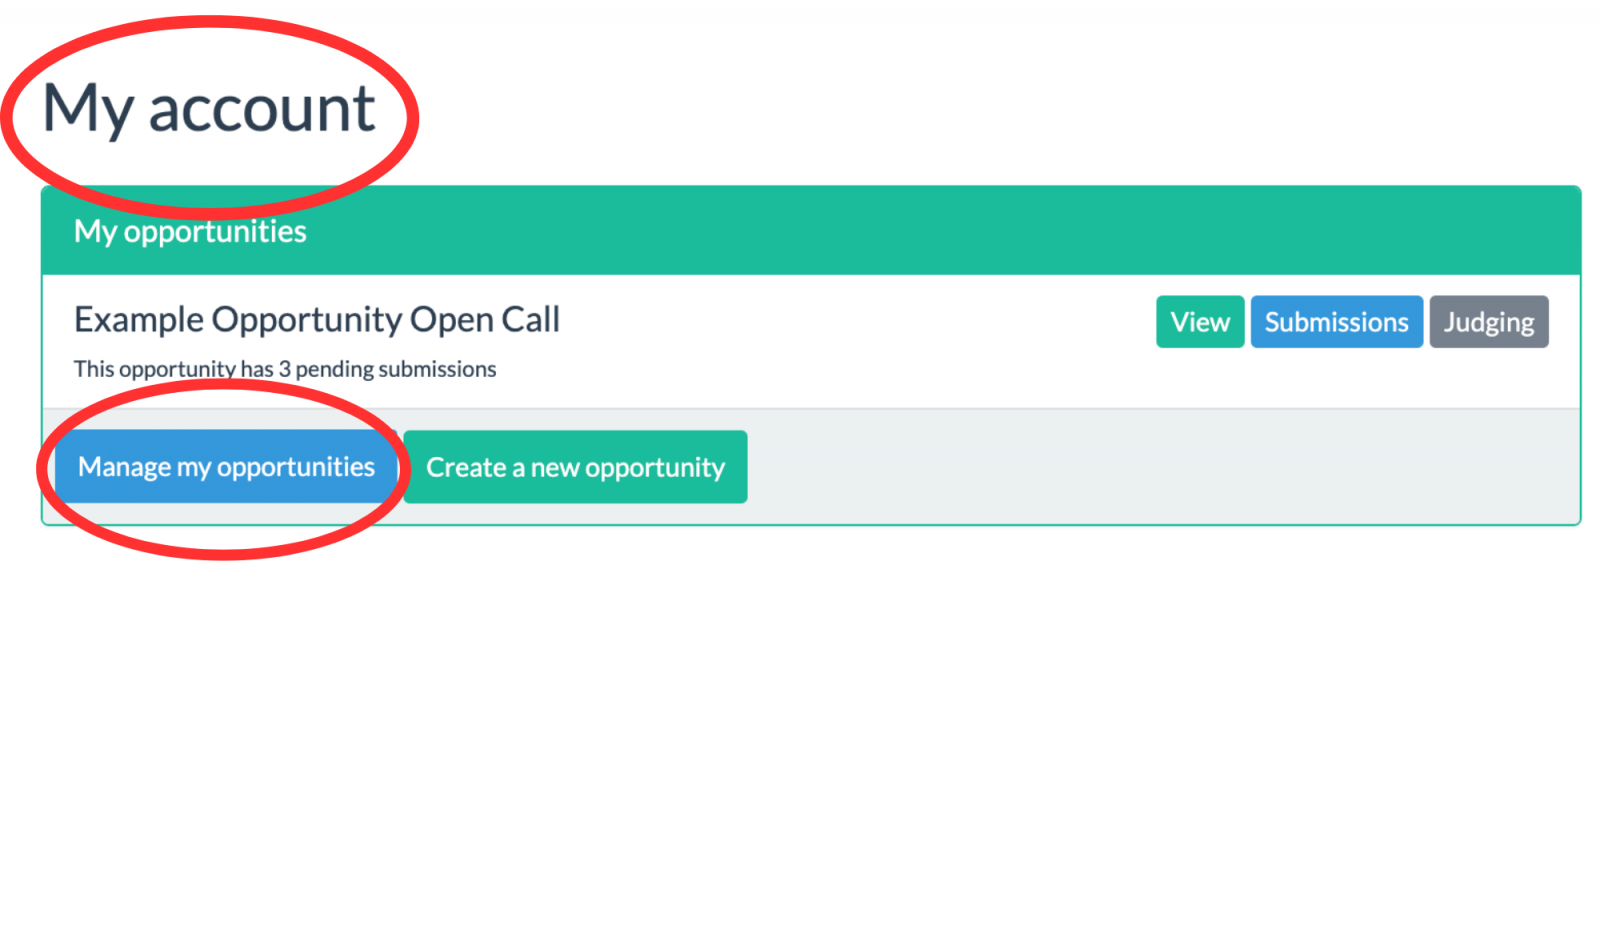
To view the submissions made to your opportunity, start by going to 'My account' and selecting the blue button 'Manage my opportunities'.
Here you will find a list of all the opportunities you've created, along with the number of submissions received for each opportunity.
ADD SCREENSHOT OF CIRCLED MY ACCOUNT AND MANAGE MY OPPORTUNITES BUTTON
ADD SCREENSHOT OF OPPORTUNITIES LIST
To view the submissions submitted for a specific opportunity, click the 'Submissions' tab next to your opportunity. Here, you will find a detailed list of submissions, including image thumbnails.
ADD SCREENSHOT OF CIRCLED SUBMISSIONS TAB
ADD SCREENSHOT OF SUBMISSIONS LIST WITH TEST INFORMATION USING LOREM IPSUM AND CS LOGO. USE ARTWORKS FIELD
To view an individual submission, click on the 'Details' button next to each submission. The available information may vary based on the details you requested in the submission form.
ADD SCREENSHOT OF CIRCLED DETAILS BUTTON
ADD SCREENSHOT OF INDIVIDUAL SUBMISSION WITH TEST INFORMATION USING LOREM IPSUM AND CS LOGO.
Adding Notes
If you want to remember anything relevant about a submission or artist, you can add a note using the 'Add note' button. These notes are visible only to you and other curators managing the opportunity.
ADD SCREENSHOT OF CIRCLED ADD NOTES BUTTON
ADD SCREENSHOT OF A NOTE WITH TEST INFORMATION USING LOREM IPSUM.
Changing the submission status
Once you start reviewing the submissions, you can assign one of three statuses to each: pending, accepted, or declined. Pending is selected by default and means that the submission is pending a decision by the curator. Accepted means that the applicant was successful, and Declined means that the applicant wasn't successful.
You can accept or decline submissions individually by clicking on the 'Accept' or 'Decline' button next to each submission. Alternatively, you can tick multiple submissions and use the 'Accept selected' or 'Decline selected' options in the dropdown.
ADD SCREENSHOTS OF BUTTONS, TICKED BOXES AND DROPDOWN
Adding Tags
ADD SCREENSHOTS OF SUGGESTED TAGS
Filtering Submissions
To filter the submissions based on their status or tag, use the filter located at the top-right of the page. This helps you focus on specific lists and streamline your decision making process.
ADD SCREENSHOTS OF CIRCLED FILTER
Contacting applicants
After the deadline passes, applicants can view the status of their submission(s) to see if they have been accepted or declined. However, they will not receive email confirmation until you contact them directly.
We believe in personalised communication, so we don't send out automatic notifications when applicants are accepted or declined. This allows curators to handle the communication personally. However, if you prefer, you can message all applicants with a standard message.
To do this, click the 'Send message to...' button and choose the applicants you wish to contact by ticking the boxes next to the submissions, or clicking 'All accepted' or 'All declined' from the dropdown. You can also click the 'Message' button next to each submission to communicate with individual artists. They will receive your message through the CuratorSpace messaging system and it will also send them an email to notify them.
ADD SCREENSHOTS OF CIRCLED SEND MESSAGE TO DROPDOWN
Downloading submissions
While we recommend using the system to review and manage submissions to help you to keep all your information in a centralised location, we recognise that you may want to download the information to review submissions offine or create a database of the artists you have selected. As such, we have made it easy for you to download submissions, either in PDF or Excel format. You can download individual, selected or all submissions. Please note that large numbers of submissions may take longer to download.
You can also download full-size images for use on websites or social media relating to your opportunity, where the artist has given their permission. However, CuratorSpace is a platform for reviewing submissions and images not for storing high-resolution files, so the images may not be suitable for printing at large sizes.
ADD SCREENSHOTS OF DOWNLOAD PAGE
We hope this tutorial has provided you with a clear outline of how to manage your opportunity submissions. If you have any further inquiries or require assistance, please don't hesitate to contact us at help@curatorspace.com.

CuratorSpace isn't another listings website; it's a place where curators and organisers can use custom online forms to allow artists to apply to their opportunity. It also allows you to see and manage all submissions made to your opportunity on the website, and to contact contributors directly.
Register now and you can start making submissions and even create your first opportunity for free.